gbyleveldt
Members
-
Joined
-
Last visited
Everything posted by gbyleveldt
-
Last 8 panels were put up last week, making it 16 * 405W JA solar panels in total. Maximum generation I've seen thus far is around 5.8kwh from solar. This generally happens in the mornings while the batteries are charging. Once charged the generation drops to 4.8kwh, which is what my inverter is rated for on the backup/non backup side. I held off taking a pic till the gutter got replaced; that took a big chunk out of the savings I had by doing it myself. I suspect there's a lesson in there somewhere

-
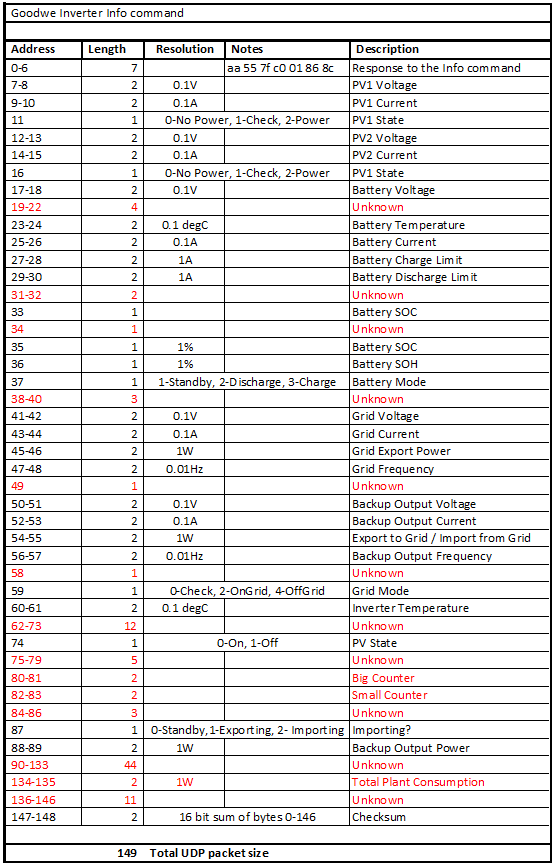
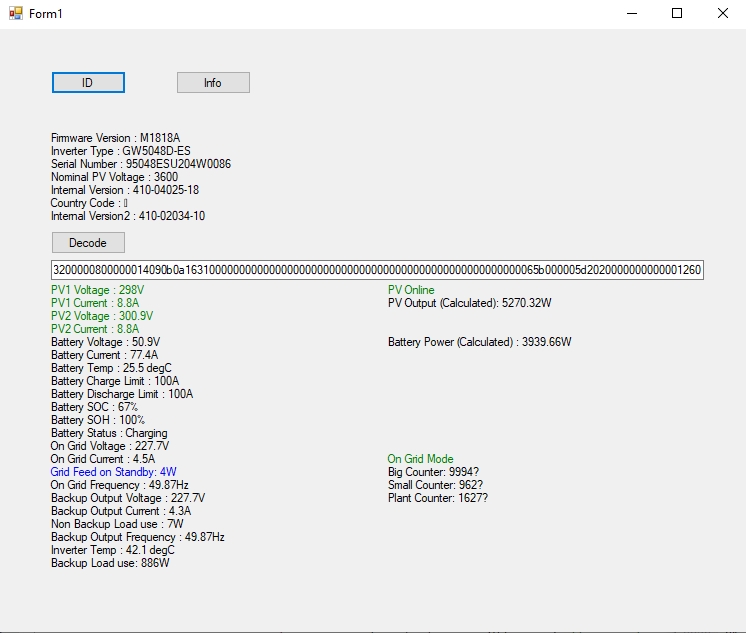
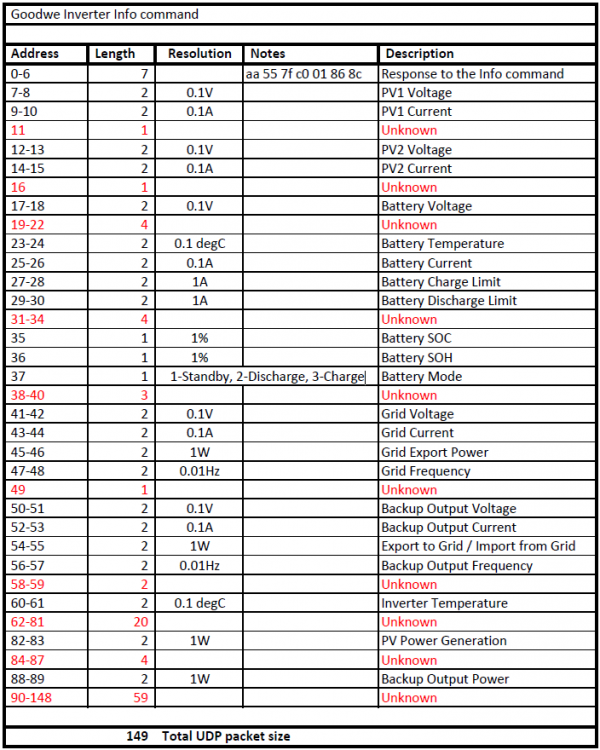
Sooo, I've had a bit more time to fine tune and verify the data. I've also managed to expose a few more bits of info from the packets; it's about at a point where there's enough identified data to be useful for logging. The idea is for this parsing to be done by a python script that runs every few seconds to feed into Home Assistant. When I have a little more time to mess with it I'll get that going, running on a Pi on my network. Below is where I'm at. Items in black I'm 99% confident of, items in Red still needs to be verified properly. Some of the AC wattage stuff isn't 100% accurate, I suspect those are VA values, not Watts, and I've not figured out if the protocol reports power factor in order to get the AC consumption figures correctly calculated.

-
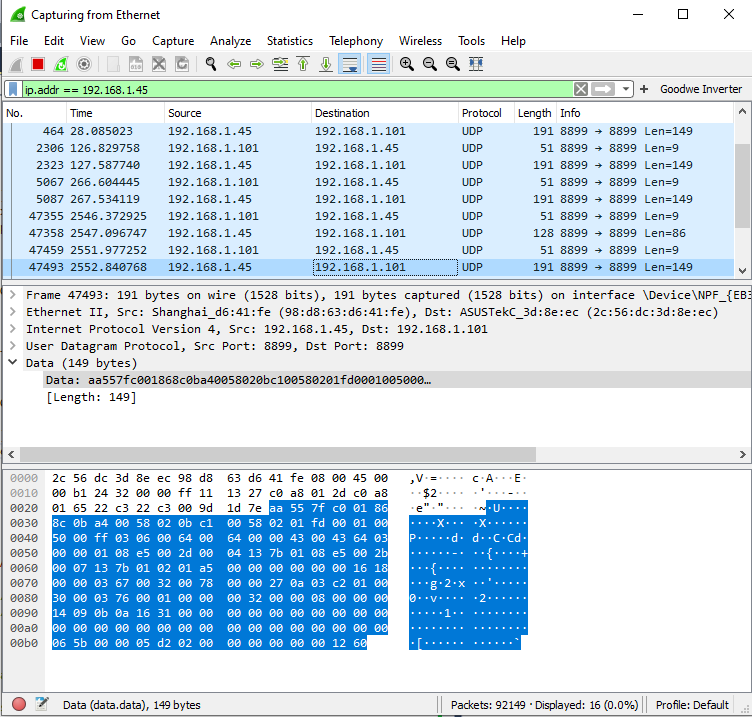
Seeing as the 'smart' home bug has bitten me in a bad way, I've been working on integrating all the various bits of electronics in the house. One of the obvious things to get integrated is the power monitoring side and in my case, a Goodwe 5048ES inverter. I'm using Home Assistant as my automation system and there is integration for this available, but only to the SEMS portal. This won't do, as the SEMS portal isn't great, it sits in the cloud and it only updates every 5 minutes or so. Ideally you want to integrate directly to the inverter and get much more frequent updates, but I couldn't find anything that is integrated directly. Looking at the inverter there's a few RS485 ports available, so it might be possible to get some data off this. But it's also possible that these are only for battery integration or otherwise unused. So, I figured a more elegant way would be to try and talk to the inverter through the network seeing as it's sitting there already. Again, there's pretty much no information available on achieving this but I figured it was worth a try. Running PV master on a mobile device and a packet sniffer running in the background, I managed to log some interesting data in order to allow me to talk to the inverter through it's network interface. I've made some progress, but this is very much a work in progress; decoding the data is a bit of a challenge but I think I'm about halfway identifying all the data. I'm posting this here as hopefully someone else has a bit more insight and can help filling in the missing blanks, or at the very least, it might help someone with a bit more smarts to crack it properly. Basically, the communication between PV Master and the inverter is in the form of UDP packets with the inverter listening on port 8899. Because it's UDP, it's connectionless. There's no need to explicitly connect to the inverter (as would be the case for a TCP connection), it simply sits and listens for the relevant requests and then broadcasts back with the results. Nice and simple, although (because of the inherent handicap of the UDP protocol) there's no guarantee that there will be a response. In testing I've had responses from the inverter in most cases, but it did happen where the response went missing. So, you'll have to make sure your implementation is robust enough for this case and for ensuring that all the data packets do arrive and that they are complete. There is a checksum in the inverter's protocol in order to validate the data, but it's something to take note of. There's a few requests you can send the inverter, and based on that the inverter can respond with things like it's model/serial, it's status or confirmations whens you change settings. For the most part I'm only interested in getting the inverter status. Interestingly, there's no authentication mechanism. You fire off the request, and the inverter will answer - provided your request makes sense. I've attached a document outlining the information I was able to decode from the information request response from the inverter. Still a few blanks there but the results are encouraging. In order to get the response below, you need to issue the following bytes to inverter IP on port 8899: 0xaa, 0x55, 0xc0, 0x7f, 0x01, 0x06, 0x00, 0x02, 0x45. The 6th byte is the request type and the 9th byte is the checksum. For the purposes of this exercise I won't go to deep into the various requests you can send to the inverter.

-
That is just plain awesome! I’ve been catching myself watching guys on YouTube making these battery packs and it’s fascinating!
-
Thank you very much, that’ll get me on the right path. I used to be a hardware and software developer in a past life, but on the hardware side it was only low current stuff. Power electronics is a different animal altogether hehe. Only real issue at the moment for me is talking to my Goodwe inverter. There are ways to scrape the SEMS website, but it only gets updated every 5 minutes; I’m looking at ways to get much faster (thus More relevant) info off the inverter to drive something like this.
-
Lots of Geyserwise installations out there, mine included for around 4 years. If there was a 50% failure rate I doubt there would be that many installed.
-
This sounds very neat. I’ve been toying with the idea of replacing my 3kw element with 2kw, but using your Triac idea means I can dynamically change the power the element uses based on spare PV capacity. Any chance you’d show some schematic and code?
-
That’s for Bluetooth 😉
-
Very very nice!
-
I’ve had this happen on mine when I let the DoD get to the 89% Pylontech limit. Don’t do that.
-
Just, wow. That should qualify for some makeover award! Nicely done.
-
Oh wow, that UI makes my knees weak! I’ve been looking at integrating the Goodwe inverter but when I read about web scrapers and mosquitos and other bugs, my eyes just glass over. I attempted to get my Paradox alarm integrated and, after getting verbal enough to make a sailor blush, I dramatically flung the WiFi thingamajig at the closed window. I’ll get there, I just develop a nervous tic when I have to learn something new “for entertainment”. I really am liking what you’ve done there though; it’s exactly what I’m after. I just want to finalize the drawings to ‘as built’ state then I’ll post it here for reference. I used the Schneider breakers - they were actually surprisingly cheap to be honest.
-
Sooo, I decided to get two more batteries and 8 more panels. Now I’m pretty much done spending money going down this rabbit hole... Anyway, I got the two additional batteries installed and managed to find a ventilation solution that’ll work while retaining the cupboard door. I’m just waiting for more panel hardware then I can get the additional panels installed on the roof. As I mentioned elsewhere, the battery stack is still running in backup mode (only charging/float mode, no discharging) in order for the packs to balance out with each other. After a day or so, all lights started flashing/displaying in sync. I’ll let it go for another day or so to make sure they settled nicely. In other news, I’ve been having a ball with getting the home integration going as well. Just basic for now, running Home Assistant, but I’ve got all the nice Sonoff light switches here, waiting for the electrician to pull in Neutrals to all the light switches in the house. In testing, I already have all outside lights, gates and garage door integrated. My wife thinks I’m a nerd...


-
Had a similar issue when I added two more batteries to my stack. It turned out the new master had one of its dip switches set. Once I made sure that all dip switches was off on all the batteries, and I turned batteries off and then on again, the whole stack started working correctly and in sync. I’ve had the stack running in battery back up mode (only charging, not discharging) the last few days in order for all the batteries to bring their SOC’s in sync as well. They all seem in sync now, but I’ll give it another day or so just to be sure.
-
I’ve found easiest way to reset WiFi, without having to hardware reset whole inverter, is to remove the 4 screws of WiFi module and then unplugging it . Leave it disconnected for a few seconds then plug it in. Within a few seconds it’ll reconnect (wifi led staying solid) and you set. Lots of people complain about WiFi on the Goodwe. Yes, it doesn’t recover gracefully from network dropouts (requiring the above procedure to get online again) but if your internet connection is stable then so is the WiFi connection. I have been upgrading my whole home network the last few weeks and the inverter WiFi only puked when I broke my network. It hasn’t dropped out by itself so far.
-
Heh, I’m not that patient. The streets’ electricity meters are in a box right outside my gate. I’ve been taking a pic of my electricity meter every morning to verify my daily consumption, so I KNOW the next bill is going to be a 1/3rd of what I used to pay.
-
Based on comments read here, I’ve connected the unmarked point to earth as well on my system. Can’t comment if it’s working as it should, as I didn’t want to open my inverter to check if it’s connected internally. But from checking EN voltage with and without grid, there’s no floating going on so I’m happy with that.
-
She may or may not have said that, I wouldn’t know. She’s currently on my ignore list since said incident. I felt a little hurt when she didn’t rush to help me, but rather burst out in fits of laughter.
-
Thanks guys! So next step is to pull the trigger on more batteries, check!
-
As for as the system performance goes, I’m pretty surprised. The panels are rated at 3240w in total; I’ve seen real numbers of just a hair under 3100w a few times around noon. I wasn’t expecting that kind of efficiency to be honest. I’m seriously re-considering if it’s worth adding another 8 panels as there’s already a fair amount of excess power available after the batteries are charged. I’ll probably end up doing it, as I suspect rainy and overcast days will hurt. The panels are actually the cheapest part of such a system, so it’s not like I’ll be wasting money. Batteries? Huh, I guess you can never have enough. The more I think about it, that’s where I’m going to spend next. It’s gonna hurt, but it’ll help me deal with “capacity anxiety” when there’s load shedding at night. Speaking of which, we had a double dose of it yesterday. During the day the whole house ran without missing a beat. Our cleaning lady even vacuumed the whole house and finished the ironing, all the while not needing to be bothered by the fact that there was load shedding. The second test of the system came at night, 3 hrs after the days’ load shedding ended, with another 3 hour session of load shedding at night. Not knowing what the system was capable of, I turned off most of the lights and the two freezers. And constantly (annoyingly was the words my wife used) checking the battery capacity. I had no idea how long this unscheduled session will last, and didn’t want the system to trip (with all the IT stuff running). Turns out I was stressing for no reason, as with our night time consumption the battery used 40% of charge for the 3 hours the power was out. I would like to have more of a buffer though, and not have to unplug freezers and swearing at the kids when they play Xbox. If I double the capacity as I originally planned for I’m confident we will be ok for most routine load sheds, with a safety net for unplanned ones as well.
-
Next up was the part that I truly dreaded. I’m blessed with being both OCD and lazy, this hardly makes for a good combination. Instead of doing the responsible thing and pay someone to fit the panels on the roof, I decided I’ll give it a go myself. Kak idea, but being a Scrooge I got what was coming to me. Read on... So I got the rails mounted on the roof. By myself. Notice the bent gutter? Well that is what happens when you tighten the last bolt, having been up and down the ladder about 50 times and getting complacent and gatvol. As I was saying, I was up on the extension ladder, tightening the last bolt when the ladder decided to stop being a ladder. That gutter valiantly tried to support my weight as the ladder disappeared from under me, but ultimately lost. After gather my wits from the event (ok, ok, I cried a little), I tried to panelbeat the gutter a little but I suspect it’ll have to be replaced. It did look a lot worse... Well it’s not pretty, but it works.


-
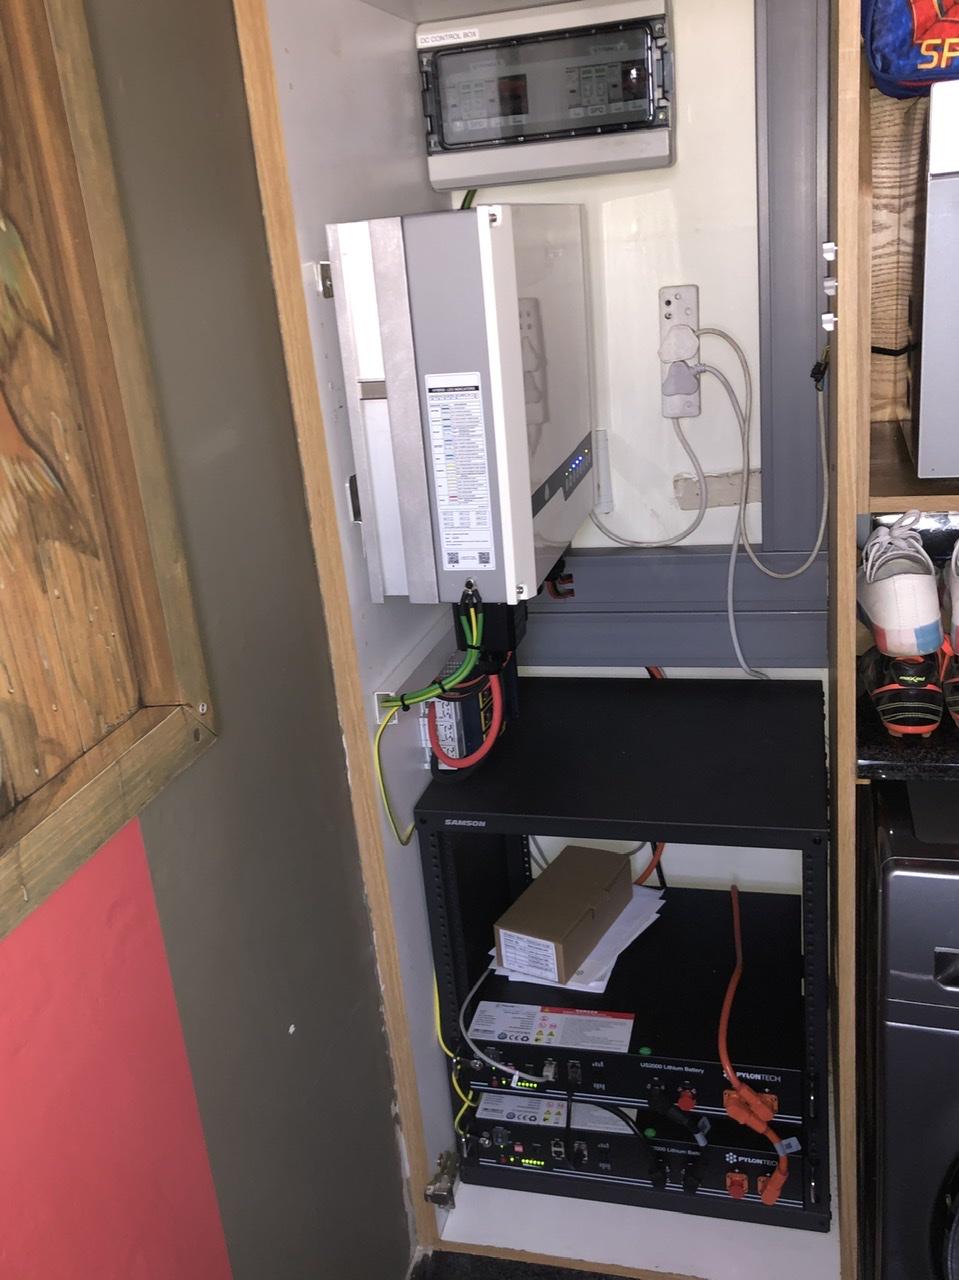
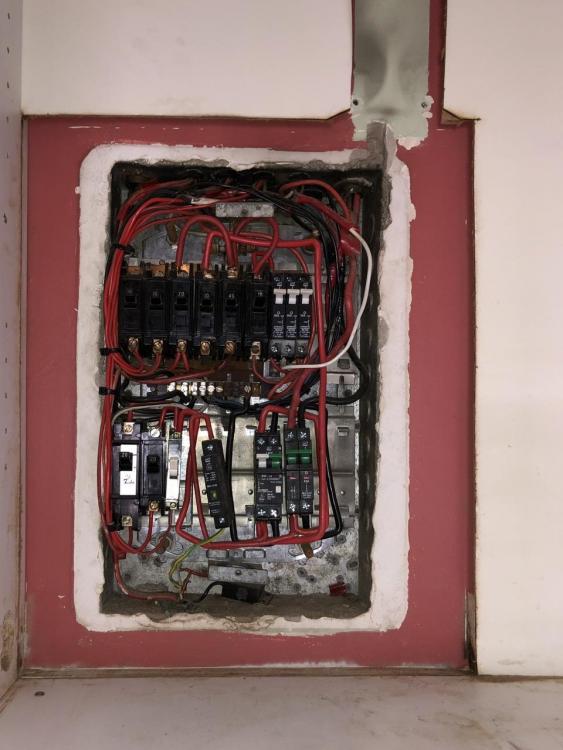
So, for years I’ve been planning on going solar but I never really spent the time to investigate it properly. Both the missus and I work from home and with the latest spate of load shedding I just had enough and bit the bullet. After much research (and poaching ideas from here), I had a solution in mind. I knew my budget wouldn’t be enough, but I had to start somewhere and get a semi decent system installed, get an idea how it works and then decide where to upgrade once the system has been running for a while. In terms of the components, I had a lot of help from the guy that supplied the kit (he ultimately needs to do the CoC when complete) and I really wanted the result to be correct. For a start, I got the Goodwe 5048ES inverter, 2 * Pylon US2000’s and 8 * 405w JA Mono’s. My plan is to add another 2 * US2000’s and 8 more panels; I’m still undecided what to get first. Anyway... I knew my current DB board wasn’t ideal for this process, so I tackled that first. As you can see, the breakers were old and there was simply just not enough space to fit everything. Luckily, this is inside one of the kitchen cupboards, so I can fit a bigger, surface mount DB board and it won’t be an eye sore being behind cupboard doors. First up, I had to figure out what went were and with what. I had to figure out which lives go with which neutrals as these had to be split into essentials and non-essentials. Yeah, eina. Clearly the wiring wasn’t going to be long enough, so this had to be extended using crimp ferrules and heat shrink. At least I now know where all the circuits go and how to split them properly (lives and neutrals together) And so the fun begins. This took a while... Almost done... Tadaaa... This is where I’m at. I still need to split some circuits (like garage and aircon circuits), but that’ll be soon. As for mounting the inverter, I was really lucky (for once) that the broom cupboard is right next to the DB board. My dear wife had to go find another place to go park her broom... Aaaaand, done! The door for that cupboard still needs to be modified. I’m going to get some nice punched and brushed alu grid that’ll replace the wood panels in the door. Obviously I don’t want to just close it up as that inverter is fanless and needs to breathe. That being said, it hardly got warm over the last two weeks, but I’d rather be safe, keep said wife less upset and to keep curious fingers at bay.


-
I went through this recently as I changed my whole DB board when installing my new solar system (the old db was a post 70’s antique). What I did was identify and mark all the live wires (switching off each cb and checking what’s affected in the house). You do this, being careful, while the mains is still on. I then went and switched off power by the feed going to the house. Once I did that, I made sure that each live had a device attached at the other end (halogen light or hairdryer), in its switched on state in order to give a low impedance load at the other end. I then removed all the neutrals and measured resistance between a known live and every neutral. This identified which neutrals go with which live. As a side note, if you find a neutral that goes with a live, it’s a good idea to still make sure there’s no continuity with any of the other neutrals anyway. This ensures that you have the correct pair and you don’t have shorted neutrals elsewhere. This is time consuming but the only sure way I could think of to get it all right.