uDuWaR
Members
-
Joined
-
Last visited
Everything posted by uDuWaR
-
Yeah sure not problems. please see the screen shots below. I need to run my geyser twice a day for 1 1/2 hours to get a nice hot morning shower and bath for the young-one in the evening. It consists of 3 rules, two the turn on the geyser one morning one afternoon and one to turn it off after 1 1/2 hours. I'll post the afternoon example and the turn off automation's. The "turn on" consists of two triggers, one for 4 pm if there is no LS or 1 1/2 hours before LS starts (this is a calendar event that is created by the ESkomsepush's integration) For the Condition and action there is one each as per below. Turning the geyser off is pretty simple. Let me know if you have any other questions.


-
Noice, so how do we enter ?
-
Have you looked at the Kodak 6.2Kw? Think is called the King II. I'll be able to run all your element based appliances at the same time and as long as your battery pack handle the output while on LS too. I installed one for my aunt (with the appropriate battery) and they are very happy.
-
Hi All I have wired a DB board for a Kodak inverter (pre-wiring before installation) and I noticed that there is an N on the Schneider Earth leakage switch on the left. The DB I have wired has the live on the left of all the breakers (as per below). My question does the N on earth leakage mean this is where the neutral should wired?


-
Man I love this so much, thanks again slipx
-
Bump!
-
Done
-
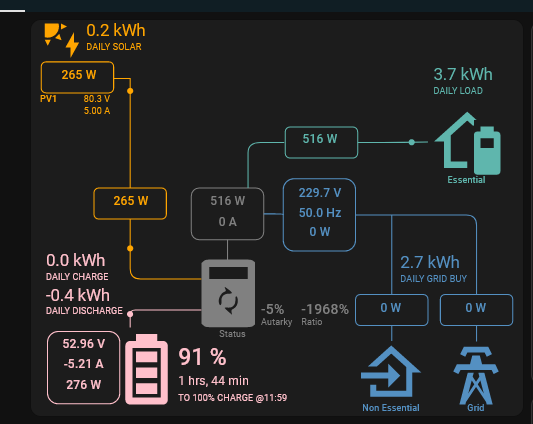
Fyi, I have managed to build quite a nice front end layout using the sunsync interface that @slipx on this forum setup: Details on this post
-
Ah yes now I see it, all good!
-
Hi Schnavel There is no value called TotalPVWatts I used: ICC-Master/Inverter1/MPPT1_Watts

-
Does anyone have documentation around this or can point me to the page in the manual (downloaded from segen) that explains how it works.
-
I set this up for my brother who has the 5.6 Kw Kodak... just need a pi and some IT experience. https://github.com/BionicWeb/AxpertPi You do need to set the MQTT settings as they are broken on startup, but let me know if you need help. it's based on the below setup https://github.com/ned-kelly/docker-voltronic-homeassistant There seems to be some pretty good support.
-
Hmm this is interesting. My mum has an 8KW Sunsync and I need to setup some automation for various things. I'll take a look your setup and see if it works for me
-
HomeAssistant with a sonoff R3 will work like a charm Read some of the posts on this automation forum, should give you good idea.
-
This is great thanks guys, Wow I was expecting a 1 to 3 % losses as acceptable but .2% is practically nothing. Now that it works I need to figure out mounting, but considering that the JA Solar is 2279mm * 1134mm and the Longi is 2278mm * 1134mm they are essentially the same size. I guess mounting holes can be drill if strictly necessary.
-
Hi All I have a question around using JA Solar and Longi Panels on my Low voltage Axpert inverter. I currently have 2 * 555W Longi panels and would like to add 2 or 4 more JA solar 550W. I have compared the stats and they are very very close (see below), if I add the JA Solar in an additional string (or two) would I have any performance degradation? The reason for this it that I can get the JA Solar panels for about R400 a panel cheaper (got the Longi's from a fellow power forum user). JA Solar Longi Rated Maxium Power [W] 550 555 Open Circuit Voltage [V] 49,9 49,95 Maximum Power Voltage[V] 41,96 42,1 Short Circuit Current [A] 14 14,1 Maximum Power Current [A] 13,11 13,19 Module Efficiency [%] 21,3 21,5
-
So after the change, I can see the the average 100% SOC voltage it now hovering at about 53.8V rather than 53.6V. See below my professional report.

-
Hey Duke You could also reserve the IP for a specific mac address for both your HA and SA on your router?
-
Hi Guys So I have been running my AM2 for about a year in the recommended (from the Manual and the side of the battery) at 53.6V. So far so good, battery charged to 100% according to the BMS every time. Now I have increase the bulk and float charges to 53.8V for some sweet .2V extra juice. Will monitor how it goes but not expecting any difference. As for the Capacity as you can see these my one is rated at 106.1 Ah. I wonder if @HubbleLithium recommends a firmware update?

-
Have a read on this topic.
-
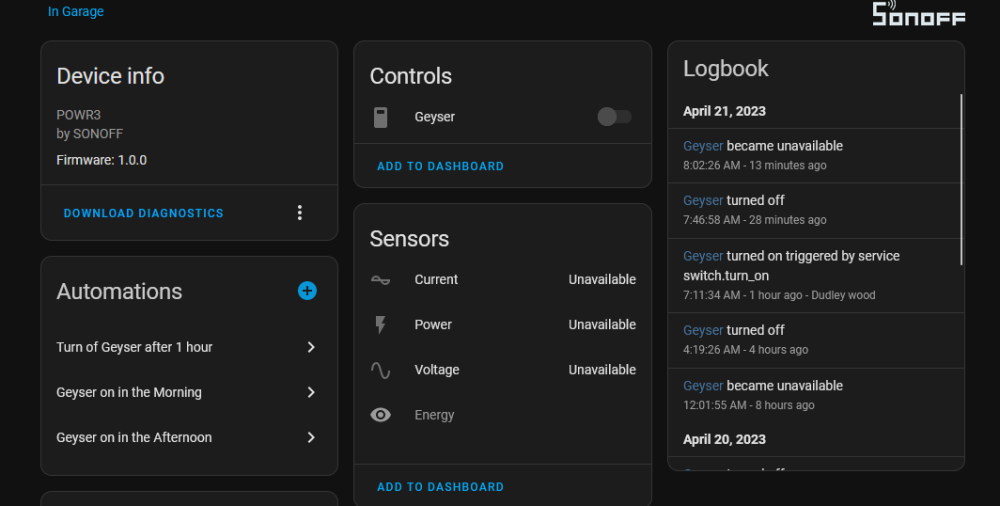
Hi @adams308 I am assuming you have home assistant installed if not then better get cracking, I have virtual box version setup on my gaming machine with a bridged network card (that part is pretty important) but you can run it in a number of scenarios. FYI the docker version of home assistant does not have the Add-Ons, these you will need. I learnt that the hard way. Also set the Virtual-box to startup on boot headless mode to make certain the HA is running all the time. Next the installation of HACS is pretty straight forward please follow https://hacs.xyz/docs/setup/download/ or I used this pretty details write-up https://www.makeuseof.com/home-assistant-install-hacs-custom-addons/ Now you should see a HACS button on the left panel you can search for SONOFF and EskomSePush, the configuration of both is straight forward. Sonoff you will need provide your eWeLink username and password. EskomSePush you will need create an account and generate an API key. https://eskomsepush.gumroad.com/l/api As for the Automation portion I have two rules, one for morning an one evening. So either the geyser starts at 4 am or an hour before load-shedding on the condition that it's between 12:30 - 5 AM Afternoon has a similar rule. Finally I have an automation that turns the geyser off an hour after it turns on. Let me know if you get stuck
-
I also use a POWR3, but instead of flashing it with Tasmota, I already have a Home Assistant with HACS and the Sonoff Plugin. All functionality already present with the advantage of using the eskom se push api where you use the automation to turn on the geyser at strategic times.
-
Hi Kevin The Actual automation config on Home Assistant is pretty easy, a few googles and some testing you'll be fine. What takes some time is configuring all the setting up all the integrations. I do know you need to install HACS on HA in order to get the Sonoff connected (no need to flash the sonoff's). As for Sunsync if you already have solar software like ICM or SolarAssistant this could be a little easier. I can help with ICM. If not you'll need to use some custom developed software for home assistant in order to pull in metrics.
-
Hey Man, This is my config to start heating the Geyser at 4AM or 1h10m before load-shedding.


-
Little update: I have managed to tag the data sources correctly so you can configure the energy dashboard in HA. Take the watt used value from the sonoff geyser switch and calculate a kWh usage Finally convert the negative number received from the ICM PI for battery used to a positive so it can be used in the Energy display. # To calculate the kWh for various watt metrics sensor: - platform: integration source: sensor.sonoff_10014e384f_power name: Geyser_energy_used unit_prefix: k round: 2 - platform: integration source: sensor.solar_grid_watts name: Grid_watts_calculated unit_prefix: k round: 2 # Convert the negative number of battery used to a positive template: - sensor: - name: "Solar_Month_BatteryKWh_Used_Positive" unit_of_measurement: "kWh" state_class: total_increasing device_class: energy state: > {% if states('sensor.Solar_Month_BatteryKWh_Used') | float(0) <= 0 %} {% set gridout = (states('sensor.Solar_Month_BatteryKWh_Used') |float |abs) %} {% else %} {% set gridout = 0 %} {% endif %} {{ gridout }} # MQTT details to pull information from the ICM PI mqtt: sensor: - name: "Solar_SOC" state_topic: "ICC-Master/Battery/SOC" unit_of_measurement: "%" state_class: "measurement" device_class: "battery" - name: "Solar_Battery_Amps" state_topic: "ICC-Master/Battery/Amps" unit_of_measurement: "A" state_class: "measurement" device_class: "current" - name: "Solar_Load_Watts" state_topic: "ICC-Master/Inverter/TotalLoadWatts" unit_of_measurement: "W" state_class: "measurement" device_class: "power" - name: "Solar_Grid_Watts" state_topic: "ICC-Master/Inverter/TotalGridWatts" unit_of_measurement: "W" state_class: "measurement" device_class: "power" - name: "Solar_Battery_Time_Remaining" state_topic: "ICC-Master/Battery/TimeRemaining" unit_of_measurement: hh:mm - name: "Solar_Month_Grid_Total" state_topic: "ICC-Master/Inverter/Month_Grid_Total" unit_of_measurement: "kWh" state_class: "total_increasing" device_class: "energy" - name: "Solar_Month_Load_Total" state_topic: "ICC-Master/Inverter/Month_Total_Use" unit_of_measurement: "kWh" state_class: "total_increasing" device_class: "energy" - name: "Solar_Month_BatteryKWh_Used" state_topic: "ICC-Master/Inverter/Month_BatteryKWh_Used" unit_of_measurement: "kWh" state_class: "total_increasing" device_class: "energy" - name: "Solar_Month_BatteryKWh_Charged" state_topic: "ICC-Master/Inverter/Month_BatteryKWh_Charged" unit_of_measurement: "kWh" state_class: "total_increasing" device_class: "energy" Dashboard looks like this now: